In this tutorial, you are going to learn how we can interface a Servo Motor with Arduino.
What is a Servo Motor
Servo motor provides the rotational motion with great precision. If you want to drive an object rotationally at some specific angle with precision you can use Servo motor in your project. It has a circuit inside it which feedbacks the system about its current position.
Servo Motor Pinout
A typical servo motor have three terminal pins.
- VCC
- Signal or PWM Pin
- GND
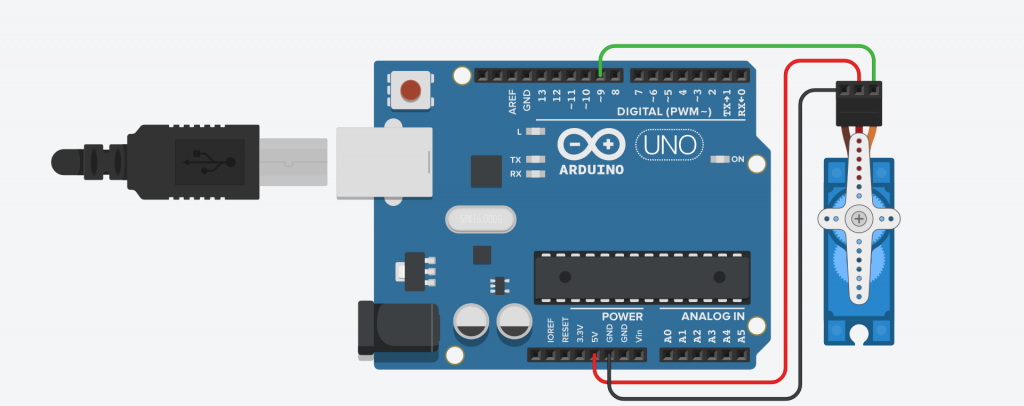
Circuit Diagram with Arduino
As you can see there are three PINs of a servo motor.
- VCC Pin of Servo = 5V Pin of Arduino
- GND Pin of Servo = GND Pin of Arduino
- Signal Pin of Servo = PWM Pin of Arduino (Digital Pin 9 in our circuit)

Arduino Code
#include <Servo.h>

int pos = 0;

Servo servo_9;

void setup()
{
  servo_9.attach(9, 500, 2500);
}

void loop()
{
  // sweep the servo from 0 to 180 degrees in steps
  // of 1 degrees
  for (pos = 0; pos <= 180; pos += 1) {
    // tell servo to go to position in variable 'pos'
    servo_9.write(pos);
    // wait 15 ms for servo to reach the position
    delay(15); // Wait for 15 millisecond(s)
  }
  for (pos = 180; pos >= 0; pos -= 1) {
    // tell servo to go to position in variable 'pos'
    servo_9.write(pos);
    // wait 15 ms for servo to reach the position
    delay(15); // Wait for 15 millisecond(s)
  }
}
First of all we need to import Servo Library in our code by using #include <Servo.h> and setup the Digital Pin 9 of Arduino to be connected with Servo Signal Pin.
After that in void loop() we are using for loop to sweep the Servo from 0 degree to 180 degree then adding a delay of 15 milliseconds at 180 degree and next another loop which is sweeping the servo back from 180 degree to 0 degree and again a 15 milliseconds delay. And this loop will continues until the Arduino is Powered On.
