In this tutorial, we are going to learn about how we can use a potentiometer with Arduino.
What is Potentiometer
A Potentiometer is a variable rotatory resistor which have three terminals. It’s resistance gets changed when we rotate it’s knob. It has three terminals.
In this tutorial, we are going to connect a rotatory potentiometer with Arduino’s Analog Pin to get the Position of its knob to make the builtin LED blink with the delay of sensor value. It is going to be a very simple project with the following components.
Components Required
- Arduino UNO Board
- 1 x Potentiometer
- Breadboard
- Connecting Cables
Schematic Diagram
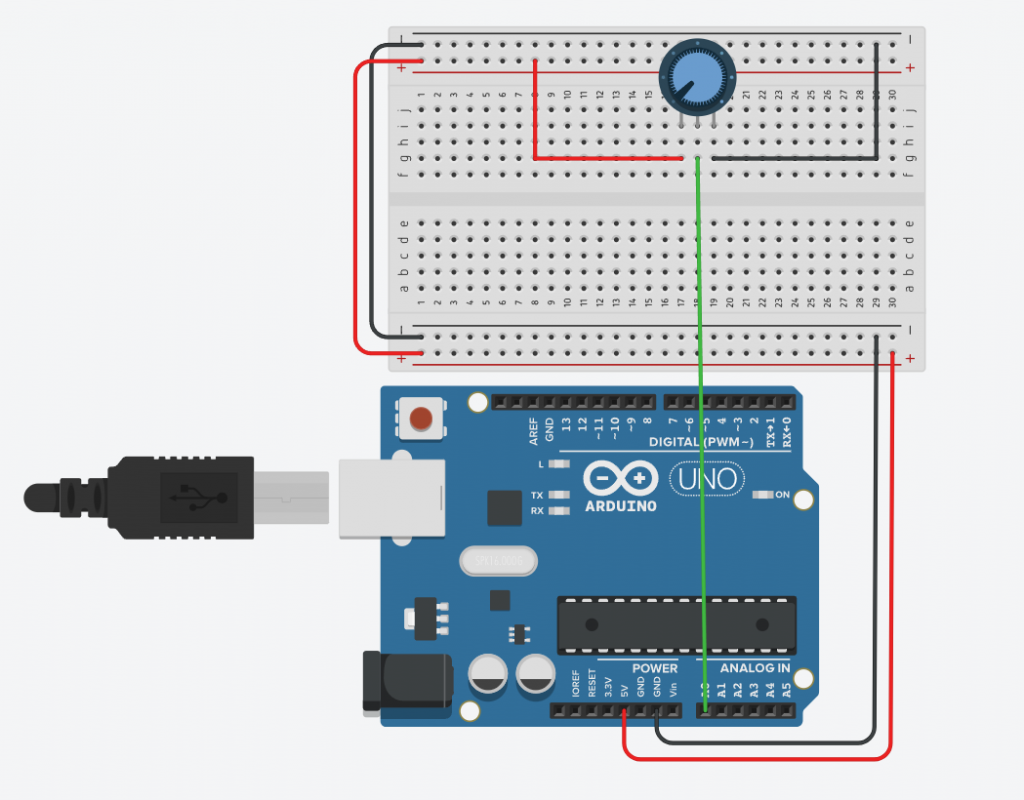
Two of the extreme terminals of the potentiometer will be connected with the 5V of Arduino and Ground of Arduino respectively, while the middle or Wiper terminal of the Potentiometer will be connected with the A0 (Analog Read) Pin of the Arduino as shown in the below image.

Arduino Code
int sensorValue = 0;

void setup()
{
  pinMode(A0, INPUT);
  pinMode(LED_BUILTIN, OUTPUT);
}

void loop()
{
  // read the value from the sensor
  sensorValue = analogRead(A0);
  // turn the LED on
  digitalWrite(LED_BUILTIN, HIGH);
  // stop the program for the <sensorValue>
  // milliseconds
  delay(sensorValue); // Wait for sensorValue millisecond(s)
  // turn the LED off
  digitalWrite(LED_BUILTIN, LOW);
  // stop the program for the <sensorValue>
  // milliseconds
  delay(sensorValue); // Wait for sensorValue millisecond(s)
}
It is a very simple program that blinks the Builtin Arduino LED with the delay between the blink depend upon the value of the Potentiometer. The potentiometer’s value is simply providing the delay time in milliseconds between the LED ON and OFF state.
First of all we define an integer variable sensorValue and initialize it with 0 value. So it means when we power ON the Arduino the built in LED be ON without any blink until we rotate the knob of potentiometer.
In the void setup(), we are defining A0 as the INPUT pin for the Potentiometer and LED_BUILTIN as OUTPUT pin.
After that we are using the sensorValue = analogRead(A0) which is storing the sensor value via A0 pin into the sensorValue variable.
After that we are simply making the LED ON and OFF with the delay of sensor value using delay(sensorValue).
Conclusion
In this tutorial, we learn how we can use the Potentiometer with Arduino and made a simple project in which we made the Builtin Arduino LED blink with the amount of time of Potentiometer’s value.
