In this tutorial we are going to learn how we can interface an IR Sensor with Arduino. IR stands for Infrared, is the commonly used sensor in our daily life i.e. It is found in the T.V. Remotes and many other electric appliances.
It is used to measure the distance between two objects so, it can be used in many electronics and Arduino Projects like Line Following Robots, Collision Avoiding Robots etc. In this tutorial, we are going to see how we can interface an IR sensor with Arduino to measure the distance between two points.
How IR Sensor Works
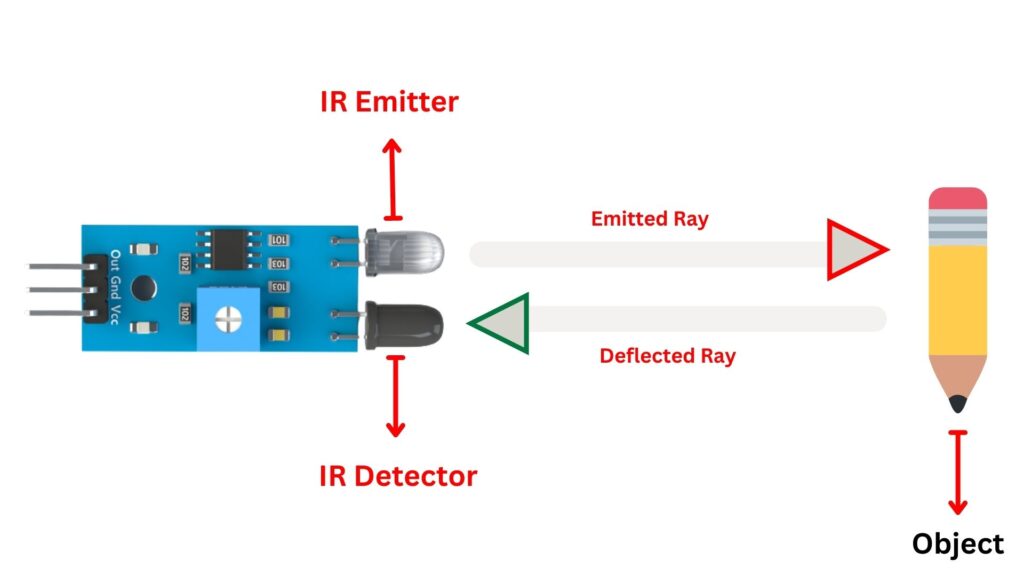
IR stands for Infrared, which means IR is a sensor that detects Infrared light rays coming out from an object. It has a very simple working mechanism. It has two diodes on it, one is IR LED (Emitter Diode) and the other one is IR Photodiode (Detector Diode). IR LED emits IR light rays which are not observable by human eye, when collides with an object, some of its part reflected back which is detected by the IR Photodiode which is IR sensitive. In this way the distance between the IR Emitter or Detector (positioned at the same point) and the object can be calculated.

Pinout of IR Sensor Module
It has three pins.
- VCC – Power Supply Pin
- GND – Ground Pin
- OUT – Sensor Output Pin

IR Sensor with Arduino
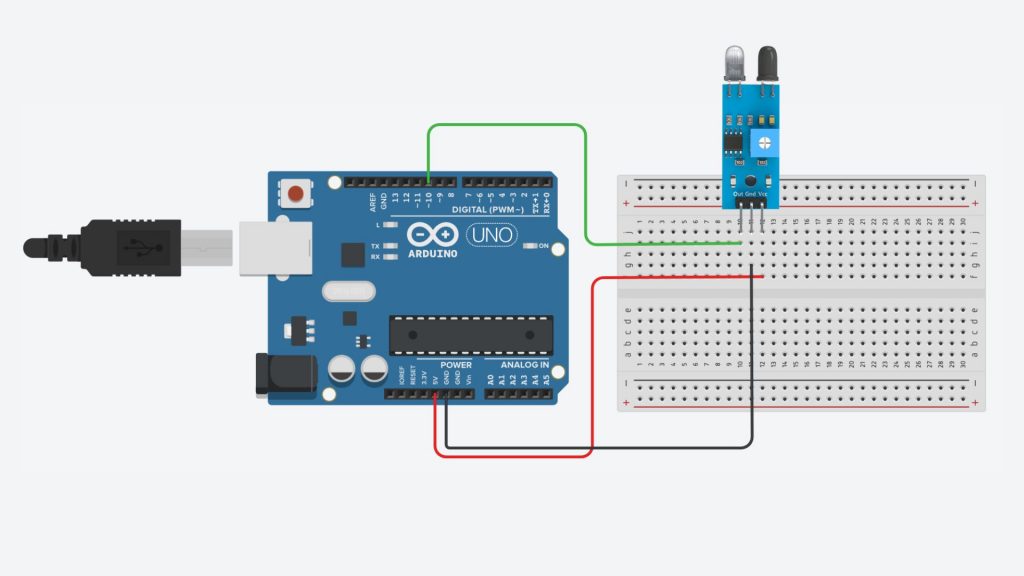
IR Sensor can be connected with Arduino very easily. As we can see there are three PINS on the Sensor out of which one Pin is OUTPUT of the sensor while the other two Pins are power and ground.
- VCC Pin of Sensor = Arduino 5V
- GND Pin of Sensor = Arduino Gnd
- OUT Pin of Sensor = Digital Pin 10 of Arduino

All we have to do is to connect the output pin of IR Sensor with digital pin of Arduino and the power pins of sensor to the Arduino 5V and GND respectively.
Arduino Code
int IR = 10; // connect IR Sensor to Digital Pin 10
int LED = 13; // connect LED to Arduino pin 13

void setup()
{
  Serial.begin(115200); // Initializing Serial
  pinMode(IR, INPUT); // IR Sensor INPUT PIN
  pinMode(LED, OUTPUT); // Arduino LED PIN
}

void loop()
{
  int sensorValue = digitalRead(IR); // Set the Digital Pin 10 to INPUT
  if (sensorValue == 1) // Check if the pin high or not
  {
    // if the pin is high turn off the onboard Led
    digitalWrite(LED, LOW); // LED LOW
    Serial.println("Object Detected!"); // Print Object Detected!
  }
  else  {
    //else turn on the onboard LED
    digitalWrite(LED, HIGH); // LED High
    Serial.println("Object is not detected"); // Print Object is not Detected
  }
}
}
We set the Digital Pin 10 of Arduino to INPUT for the IR sensor and Digital Pin 13 of Arduino to Output for LED. We initialize a variable sensorValue and store the pin 10 value in it. After that we used if else statement to turn the LED ON if the sensor value is High and turn the LED OFF if the sensor value is low.
The working is very simple. When there is an object in from of the IR Sensor, it turns the onboard LED ON and when there is no object in front of the IR Sensor, it turns the onboard LED OFF.
